Showing posts with label before and after. Show all posts

Sunday, January 28, 2018

Lancome Grandiose Extreme Review With Pictures... Is It The Best Mascara?


 Lancome has been known to have some pretty great mascaras and I was anxious to try this one when it caught my eye. I have been slowly trying them out to find which is my favorite. I will be doing a review on all of them and rating them from 1 to 10.  

The first one I reviewed is their 'Grandiose Extreme' a mascara they claim will give you volume, length and up to 24 hours of wear. The wand is shaped in what they have trademarked " The Swan Neck Wand" which is what helps you achieve the latter.

Grandiose Extreme  

My first impression of the mascara is how beautiful the packaging is. I really liked the shape and details of the bottle. 

The curve of the wand is meant to help apply the mascara more precisely. It took some getting used to but after a few strokes I got the hang of it and it actually does help apply it more precisely. 

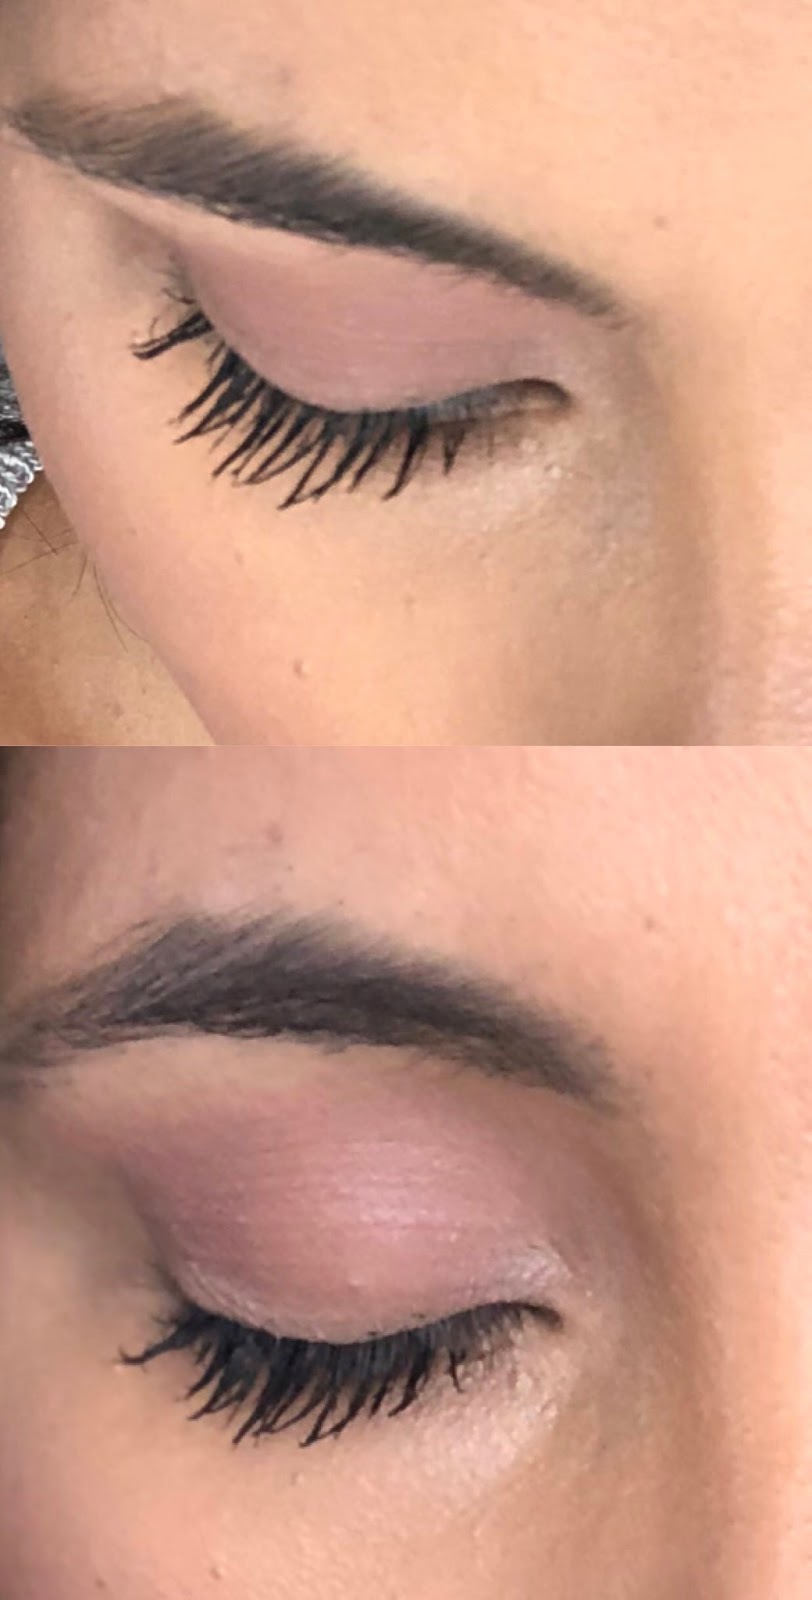
The texture of the “formula”that coats your lashes is very nice. It allows enough time for you to brush the mascara and style them to your liking then dries to a vibrant matte black 👌🏾

The real concern all woman have when wearing a mascara... Is it going to run on me? I have really sensitive eyes and they constantly get watery, so I’m very picky when it comes to choosing my ride or die mascara. 

The first time I wore it I had a full face of makeup on, I was in front of lights and I moved around a lot. The mascara did not run it held up well. So I’m starting to get really excited now.

However it looked spidery and clumpy, I was very disappointed at this. 


I was ready to put it back in the box to return it, then I realized why my lashes were so clumpy. I got eyelash glue on them . How does one forget to wait for the glue to get tacky. 🤷🏽‍♀️

I gave it a fair try again and my lashes looked a lot better. I worked out and cleaned the house, it did not run. My lashes held the curl and length for like 10 hours.  


The Score 

I would rate this mascara a 7, the wand design can be a little tricky and I smeared mascara on my eyelid and cheeks a few times.

The application of the mascara would go on so much more even and less heavy if the wand didn’t pick up on so much formula. The solution would be to wipe some of it off but then you end up wasting a lot of product. 

Overall it’s a good mascara with more positives then negatives but it’s definitely worth trying. 

What Mascara should I review next? 

Wednesday, December 13, 2017

My Pursuit Of Eternal Youth With Nurse Fiona Featuring: Viva by Venus Versa With PRP Facial Review!


Aging is inevitable. Aging gracefully while for a very lucky few happens naturally, for most is a choice. A choice we can make everyday when we decide to put sunblock in the morning before heading out, the choice to wash our makeup off every night, the choice to invest in good skin care products, the choice to try some of the many DIY's out there to help your skin look its best. One of the most important routines for me in my hopes of aging gracefully is having a good facial every month. If you have been following for some time then you know I love Nurse Fiona and her staff. They stay up to date with the latest and best skincare treatments and they are just the most genuine and knowledgeable people to have looking out for my skin. 

Two weeks ago I went in to try the Venus Viva with PRP facial, a non surgical skin resurfacing that corrects signs of skin damage and improves the appearance of acne scars. It improves the appearance of enlarged pores, deep wrinkles, uneven skin texture, rosacea, scars and stretch marks. Adding your PRP to the Venus Viva is optional but its so worth it. 

PRP is short for Palette Rich Plasma it is obtained by drawing the patient's blood, spinning it down in a centrifuge, drawing off the layer of Platelet Rich Plasma (rich yellow liquid). Fiona Drew two vials, one to apply with the Venus Viva and one to inject directly into my skin. The benefits of PRP are when injected into the skin it helps repair, rejuvenate and remodel damaged tissue. All this means is more collagen production in the ares injected, which helps with fine lines, wrinkles, skin texture, enlarged pores and uneven skin tones. 

Before Your Treatment: 

Avoid products like Retin-A, scrubs, sun bathing, and salicylic acid for at least one week before treatment. 

The Process: 

The Esthetician will do a skin analysis to determine what strength is best for your skin concerns and skin type. Then the Esthetician starts by numbing a small area on the back of your neck where she will test the strength to make sure you are comfortable with it and your skin has no reaction. If you are adding the PRP Fiona would have drawn your blood around this time as well. 

The Venus Viva treatment on its own lasts around 45 minutes, with PRP about about one hour and a half. The whole treatment was very comfortable for me, I would rate the "pain" level to a 1. The best way to describe the feeling is like light pins on the skin. 

The second vial of PRP was then injectected by nurse Fiona, the pain level for this part was between a 3-5. The eye area surprisingly was the least painful, around the mouth was a very pinchy and burning sensation.

The After Care:

My skin was immediately red and as the numbing cream started to wear off I can start to feel the "burning" and discomfort one feels after a sunburn. It also felt dry and hard from the dried up plasma.

As always the aftercare is all up to you, the results will be more effective if you follow the recommendations given by your esthetician and nurse. The aftercare is very simple in my opinion; No sunscreen for 24-48 hours after treatment so stay indoors! Use a mild cleanser for the first week or two after your treatment and avoid scrubs, or any harsh products. 

I was given a post care product kit to use the cleanser, I washed my face the next day so I can have the plasma doing its thing overnight. My routine convicted of only two steps; Mild face wash (Ormedic By Image) and a light moisturizer. 


Overall I'm satisfied with the results so far, I have some breakouts which is very normal after any facial treatment. The only negative I would say is my skin was not back to normal as fast as I was expecting. On day 6 I could still see the squares the laser leaves behind but nothing makeup couldn't cover. The whole process of the Viva was painless and fast, the PRP was a little more uncomfortable but very bearable. I can notice a difference under my eyes and in the brightness of my skin. 

I would definitely get the treatment done again every few months to maintain a youthful complexion! 

The treatment can be done every 4 weeks if targeting major issues, for preventative treatment it is recommended every 3-6 months. 


Where: Nurse Fiona Medical Spa HERE
Treatment: Viva by Venus Versa
Price: $500 
Add PRP for $300
Mention @steffanyschoice at checkout and receive 20% off your spa treatments. 


For more information I might not be including here or a list of contradictions go to the Venus Viva website HERE


Saturday, November 25, 2017

Life Update: Four Girls, A Breast Lift And Lots Of Goals!

As some of you may know I have been giving this blogging thing a go for a LONG time now, way before it was even so popular. Its something that I genuinely love to do and every time I let life get in the way and stop doing it, I cant stop thinking about it. I wanted to start making these life update, this way I not only keep my self accountable for the goals I set for myself but to also keep it 100 with all of you. According to my Facebook history it was a little over six years ago that I first uploaded a video to youtube, six years is a long time. 

During those six years I stayed active for maybe half the time, I would start blogging consistently make a little progress then stop. Well my friends that is why today November 20017 I am not any where near as successful in the blogging word as my peers that started blogging around the same time  as me. There are days that this makes me feel a little frustrate with myself, but these past six years, while I have not been consistent with my blog I have been consistently growing as a wife and mom. 
I am now the mother of four beautiful girls, we moved in to a dream home last year and I am now more clear and focused on what I want to gain from "influencing". 
The one thing that people fail to realize is that blogging takes A LOT of work, I find my days struggling to make time in the day to get some post up. There is so much details that go into it now, everything is so saturated and there is where someone starting can get discouraged.

I always get asked the same questions, how do I start a blog, how can I be successful. My answer is always the same: do what I haven't done, be CONSISTENT!! I cant stress that enough, its unbelievable the amount of engagement I get when I'm consistent. The second most important, be genuine I refuse to post or share anything that I wouldn't recommend to my family or use myself. Last, make sure its something you truly love and enjoy or it will not work out. My last advise for anyone wanting to start a blog? make a schedule, plan out your week every Sunday, this is where I struggle because I have five lives that depend on me and can change the course of my day on any given moment. That being said if you have it written down on a calendar it will most likely get done. 

I will end this part of my life update with this quote that its as real as the Six and a half years that has passed since I uploaded my first video: " Don't think about what can happen in a month. Don't think about what can happen in a year. Just focus on the 24 hours in front of you and do what you can to get closer to where you want to be. 


Mama Got A Boob Job 

Breastfeeding my girls was always the plan, it was something that I can never imagine not doing. I bonded with them in a way that no one else in the world can. That beautiful experience however left your girl with her Double D boobs looking like a hot mess! I knew I needed a lift and a reduction even after Gabi (13) but there was no way I could ever live with the idea I wouldn't be able to breastfeed any of my kids so I patiently waited to be completely done having babies. 

The truth is I always felt guilty for wanting to get a breast lift, my family however were all so supportive that after Camila my angel baby, I went and did something for me. The thought of going under the knife was the most stressful thought I ever dealt with. I could not shake the possibility that I could die. I cried so much and honestly thought of not going thru with the surgery many times. 

I will not get to into the whole logistics of it but I am happy to say even after some complications I am happy I did it. I was hoping for a smaller cup but because of all the excess skin I had, the implant had to be of a larger size. Today almost 3 months post-surgery I am almost back to normal. I think when all the inflammation is gone I will be a true C cup which will be great. 

So thats my life update, I look forward to 2018 being the best year of my life! 

Monday, November 13, 2017

DIY Of The Week: Grow Longer Healthier Hair With Four Ingredients In Your Kitchen!

  I can honestly say that nothing keeps my hair healthier or growing long like my all natural DIY masks. I can tell the difference almost immediately after washing the masks off and the benefits don't stop there. One of my all time favorite masks is made up of four of my favorite ingredients; Coconut Oil, Olive Oil, Honey, and Egg. Rich in proteins, omega-3, anti fungal and hydrating ingredients. I like to use this mask every other week, and use a regular shampoo and conditioner in between. 


Ingredients:
  • 1 tbsp coconut oil
  • 1 tbsp olive oil
  • 2 tbsp honey
  • 1 egg
Directions:

  1. In a bowl, combine all ingredients, make sure to beat the egg first before adding the other ingredients. 
  2. Apply it to hair, coat starting from root to ends, massaging it in the scalp in slow circulation motion. This will encourage faster hair growth 
  3. Cover hair with a plastic shower cap and leave it on for at least 30 minutes. I leave it on while I clean around the house to get the maximum benefits.
  4. Rinse
  5. Wash off hair completely and style as usual.
  6. Enjoy beautiful, long, healthy hair!


Friday, October 20, 2017

I Used Carbon Coco To Whiten My Teeth And This Is My Results!

I know by now we have all heard by now about the efficiency of charcoal to whiten teeth. However I had never used it before so this is my review.  I was sent a little package from Carbon Coco to try and give my honest opinion to my readers!


A description From their Website:  

Made from 100% certified organic coconut shell charcoal, Carbon Coco not only brightens your smile, but also improves your overall mouth health.Our medical grade activated charcoal powder removes toxins, stains, and plaque from your teeth through a process called adsorption, in which activated charcoal binds with these particles and flushes them out of your teeth and mouth.The super finely milled polish won’t damage your enamel or gums and also contains bentonite clay, a natural ingredient that helps remineralise teeth plus a hint of lemon myrtle, which has gentle and non-acidic antibacterial properties.


How do I use it?
Wet brush in small and dip into the carbon, gentle circles (no need to brush hard!) for 2-3 minutes. Rinse, then brush with Carbon Coco toothpaste for 3 minutes. This is best used before bedtime to allow residue (if any) to dislodge overnight.

My Review
I have been using Carbon Coco for five days in a row now and I'm ready to give my review. I used it as recommended and can say it works! Its definitely not an overnight thing were you will get instant results but every day my teeth look whiter. 

       The Pros:                                            The Cons: 
         All natural                                              Messy 
        No Sensitivity                                 Time Consuming   

I have to say, the charcoal can get messy, when opening the jar no matter how careful I was there was always fallout on the sink. Also it takes about 7 minutes to the whole process and add 5-15 minutes if you add the oil pulling which I did not receive to try and review. 
That being said I prefer to use this versus other methods that make my teeth sensitive and only targets the color. Carbon Coco has so many more added benefits that really gets me excited about brushing my teeth! 


Product: Carbon Coco 
Price: $59.90
Website: Carboncoco.com
 I only recommend products or services I use personally and believe will be good for my viewers. This review is not sponsored by Carbon Coco but they did send me the products to try and give my honest opinion. 

Sunday, October 15, 2017

I Use Dermaflash To Shave My Skin And This Why You Should Too!


I remember the first time I tried shaving it did not go as "smooth" as I planned it in my head. I used a BIC three blade razor and well my skin did not react so well. I broke out, I even cut my skin (ouch) and took half of my brow off. Fast forward a couple of years later, I tried waxing the hairs off and this time it went really bad for my skin. I broke out like I had never broken out before and it took months for my skin to clear out. I was left with no desire to remove my little vellus hair, until one day years later my esthetician asked me if I wanted to add dermaplaning to my facial. I went on to tell her my past experiences and she laughed and said girl I got you. 
Turns out the reason I was breaking out before was very obvious, I was over exfoliating by using three blades. I also irritated my skin by using hot wax to my sensitive thin skin. 


I was hesitant but decided to try dermaplaning the fancy name for shaving. It was amazing, my skin looked radiant, smooth, more even tone, my makeup went on more effortless, I needed less product. The only downside was the price tag. It added a whopping $75 to my already expensive monthly facial.


I was shopping for skincare products one day and came across Dermaflash and well it made perfect sense to own this little tool. I can do my own dermaplanning at home whenever I want to and save money! I achieved the same awesome benefits as the professional dermaplaning at a fraction of the price. 

Dermaflash is easy to use, its a three-step system: Prep, Edge, Soothe. First, you prep the face with the included cleanser. Then, insert a new Edge into the device and using short feathery strokes, use the device on the face to remove built debris, dead skin cells, and peach fuzz. Lastly,  soothe the skin with the Hydrating Moisturizer


Here are some more tips to follow, for how to use your dermaflash and have the best experience with it: 

-Use DERMAFLASH one time per week for maximum benefits. 
-DERMAFLASH is for use on a woman’s face only.  
-Follow the three-step method: Prep, Edge, Soothe 
-Charge device overnight before use. Device will not charge with Edge in place.
-Insert a new Edge prior to each treatment.

The last one is the most important to follow, don't reuse the blades. This is how you can cause irritation and breakouts, the secret to dermaplanning success is always making sure you use a brand new blade and use awesome products for your skin to absorb and benefit from. Below is a video of how I use my dermaflash! 


I want to note that Dermaflash sent me a devise for me to try and give my honest opinion. I only review products I love and use. 


Saturday, September 2, 2017

I Tried Kim Kardashians KKW Beauty Contour Palette And This Is My Review!


I don't know if I'm alone here but when Kim Kardashian announced that she would be releasing her beauty line I could care less. Let me clarify that I don't either love or hate Kim, I find her to be a beautiful and very hard working woman that turned a negative into a multi-million empire. Her first release was the contouring sticks that I absolutely knew I did not want or need to try, the powder contour kit however did catch my attention. 

I watched a few of the Youtube videos she's brilliantly doing to promote her products and I was convinced that this may be a winner. On the launch date I went to the KKW Beauty website and to my surprise they were all available, the website was running smooth, no check out lines. I picked the shade medium and proceeded to the check out. The palette itself is $52 plus a $8.95 shipping fee, I don't know about you but I thought that was pretty high. 


The palette comes with four pans, two highlight shades and two contouring/bronzing shades, it also includes a double ended brush. My first impression of the palette is pretty, I like the nude packaging and the feel. The palette has a very nice big mirror and the pans are fairly large, the colors however looked a lot more orange than I was expecting. This immediately gave me a bad feeling since orange isn't really the shades I want on my contouring and bronzing kit. 


I proceeded to do my makeup how I normally do and then used the contouring kit, using the brush it comes with was very hard. The brush itself is larger and stiffer than I like my brushes to feel. After unsuccessfully using the brush I proceeded to use my own brushes. The color did apply smoother, however I was only able to use one of the two contouring shades. The orange shade is to much on the face but it was nice on the eyes. The highlighting shades were too ashy on my skin, it accentuated my pores and did not give me that glow I was looking and hoping for. I did my whole eye makeup with the palette as well. I apologize for not swatting the products in my arms they were not photographing well and I had to run out. The contouring color I was able to use on the face blended out really nice and looked great. 


I have to say this palette is not worth the hype or price, I feel its way to over priced and the formula needs some major improvements. My main disappointment is that Kim is a medium shade, I assumed that if she was putting any thought on the creation of her palettes, the one palette that should be on point is the medium. The highlight are to chalky on my skin and just don't work, and the brush like I said don't help the powders blend smoothly. If I was Kim I would put a little more thought on creating shades more complimentary to ALL skin shades. I would also make the brush softer and one end skinnier for a better highlight application. All four colors looked good on my eyes, but thats not enough to justify this purchase. 


Monday, November 23, 2015

Tarte Tartelette In Bloom Palette Review And Makeup Looks!


This palette is EVERYTHING, I mean I seriously haven't been this in love with a palette in a long time. First impression when it arrived in the mail was how freaking gorgeous the actual palette is, like the type you want to keep in your vanity even if the actual colors aren't cute. Then I played with the colors and WOW this is what you call a win win. The colors are gorgeous, apply like butter and are highly pigmented...... Oh and they smell yummy! 

I took the risk and tried it on my client that same day I received it, and the colors complimented her so beautiful and photographed beautiful too. I used it for my birthday date and could not decide for which colors to use since they are all so gorge. 

The palette is only sold at Tarte for $45 and its worth every dollar!

Left To Right: charmer, jetsetter, rocker, smokeshow

Left To Right: flower child, smarty pants, firecracker, activist

Left To Right: funny girl, sweetheart, rebel, leader

My birthday date look! 


My Beautiful Clients Wedding Trial!

Friday, November 20, 2015

Glamglow Giftsexy Ultimate Anti-Aging And Clearing Skin Gift Set Review!


I took major advantage of Sephoras 20% off event last week to purchase some of the products I have been hesitant to buy but found over priced. I had my eyes on the Glamglow masks for some time, but I'm very picky when it comes to skincare products. My skin has been acting pretty good lately with the occasional little break out here or there, not complaining at all since I know it can be 10 times worst. 

This set contains:
- 1.7 oz Youthmud Tinglexfoliate Treatment 
- 0.5 oz Supermud Clearing Treatment 
- 1 oz Youthcleanse Daily Exfoliating Cleanser 
- Dual-ended applicator brush 


This gifts set is amazingly priced at $69 and its worth every penny, I have been using the cleanser at night time to remove my makeup and it does a really good job at removing my makeup and exfoliating my skin but also super dry so I will not be using this everyday. The masks are really with all the hype, I tried the Youthmud first and my skin was glowing, like even my husband commented on how great my skin looked. 

Today I tried the Supermud clearing treatment and wow I LOVE it too, I could actually see it working on deep cleaning my pores. After 10 minutes I rinsed off and my skin looked so much brighter and clearer, I took a picture (below) right after to show you the results. The kit comes with a dual ended applicator brush and it helps you pick up the product from the jar and apply it effortlessly. 

Overall I am really happy with this purchase and will definitely be adding it to my beauty routine and even in my studio to use on clients! 


Remove after 10 minutes 

Right After Removing it!


Wednesday, November 4, 2015

Lipland Amrezy Liquid Lipstick Review!


If you have Instagram and are into makeup, than you have heard of Amrezy AKA Glamrezy. I started following her a few years back and its amazing to see how far she has come, first with an eyeshadow palette and now lipstick. The sky is the limit for this beauty, I am one to support and root for anyone thats trying to take their dreams and make them a reality. 

Lipland and Amrezy collaborated to create three beautiful liquid lipstick and they really did a great job, the colors are beautiful, super pigmented, and long lasting. The colors glide on smoothly and dries to a matte finish. If you follow me on Instagram (please do) I posted a video showing how long lasting it is, even after I had to scrub it off my arm with a loofa a more soap!

Left To Right: Brooklyn, Rezy, and Montenegro
Brooklyn Is A Deep Tangerine Color  
Rezy Is A Peachy Nude With Light Pink Undertones
Montenegro Is A Deep Plum-ish and Burgundy

(Natural Lighting) Left To Right: Brooklyn, Rezy, and Montenegro

(Flash) Left To Right: Brooklyn, Rezy, and Montenegro